Using Att&ck and Atomic Red Team to Detect MSBuild Abuse (Part 1)

Creating SIEM use cases for any organisation can be a daunting task. The increasing number of advanced (and not so advanced!) techniques leave many security operations teams with a mess of half-working, undocumented and untested use cases. Building a robust, repeatable framework to create, test and document the detection of new threats is essential.
In this post we're going to walk through using the popular Mitre Att&ck framework and some excellent open source tools to help us build an enterprise ready framework for creating, testing and documenting use cases.
In part one we will configure our test system and generate some log data of the attack technique.
- Setup a test Windows 7 system using FlareVM
- Install Sysmon using the @SwiftOnSecurity config and configure Windows event logging
- Plan a repeatable simulation using the Mitre Att&ck framework and Atomic Red Team
- Execute atomic test T1127 to generate event log data
- Review the log data
Then in part 2 we will begin creating some detection use cases and documentation.
- Run Sigma to generate initial SIEM use cases
- Use the Palantir Alerting and Detection Framework to create draft use case documentation
- Investigate other MSBuild.exe techniques and refine our use cases
To do this we will be using the following tools.
- A Windows 7 FlareVM for testing
- Microsoft Sysmon and @SwiftOnSecurity Sysmon configuration
- Mitre Att&ck framework
- Red Canary's Atomic Red Team testing framework
- Florian Roth's (@cyb3rops) SIEM use case generator Sigma
- Splunk or your preferred SIEM solution
- Palantir's Alerting and Detection Framework
Now lets get started!
MSBuild Technique Overview
MSBuild is a technique discovered by Casey Smith (@SubTee) to execute code and bypass applocker, device guard or other whitelisting solutions. It's great for executing 1st stage payloads then performing more advanced injection techniques for (almost) diskless implants and C2.
This technique has been proven to be used in the wild so will make a great example for our framework.
Casey's blog is no longer available however you can find the original article on the Wayback Machine and a quick google will find many other examples of offensive usage.
I found a Microsoft signed tool called MSBuild.exe. This is a default .NET utility that ships with Windows. I usually start with the question; ‘HOW could I get MSbuild to execute code for me?’.
Turns out, MSBuild.exe has a built in capability called “Inline Tasks”. These are snippets of C# code that can be used to enrich the C# build process. Essentially, what this does, is take an XML file, compile and execute in memory on the target, so it is not a traditional image/module execution event.
Installing a Test VM Using FlareVM
FlareVM is designed to quickly setup a Windows 7 based malware analysis VM but it's also an excellent base package for a general security research. Think of it a little like Kali for Windows.
Personally I have a semi-permanent FlareVM for research and CTF's and other temporary FlareVM's using a trial Windows version for malware analysis.
If you don't have a valid license key then Microsoft offer pre-built images for testing purposes that can be used.
- Make sure you have a way of setting up a virtual environment such as VMware or VirtualBox. If you're unsure how to do this checkout @da_667 who has excellent resources on setting up virtual lab environments
- Download and install IE11 on Win 7 (x86) from https://developer.microsoft.com/en-us/microsoft-edge/tools/vms/
- Follow the instructions to install FlareVM
- Note when running install.ps1 just hit enter when asked for a password, the IEUser autologin is already configured in the image
We're also going to want to install a few extras such as git and the Windows 7 remote administration tools (RSAT) so lets do that now.
Installing tools using the Chocolatey package manager setup by FlareVM is as simple as opening an admin cmd or powershell window and typing the below.
choco install git
choco install rsat
Endpoint Visibility with Sysmon and Windows Event Logging
Detecting these sorts of attacks on Windows is not possible out the box and having process logging is essential.
Windows can be configured to perform rudimentary process logging but Sysmon or an EDR solution should be considered mandatory in any enterprise environment. We'll look at both outputs to compare and see how Sysmon and EDR tools can help create much higher fidelity detections.
- Download Sysmon
- Clone the sysmon config with "git clone https://github.com/SwiftOnSecurity/sysmon-config.git"
- Open an admin cmd or powershell window and configure Sysmon using "sysmon.exe -accepteula -i sysmonconfig-export.xml"
We will also want to configure Windows Event ID 4688 which is turned off by default but does enable Windows to log process events without the need for Sysmon.
- Using the RSAT tools installed previously open the "Local Security Policy" console
- Navigate to "Local Policies -> Audit Policy -> Audit Process Tracking"
- Edit Audit Process Tracking to enable "Success"

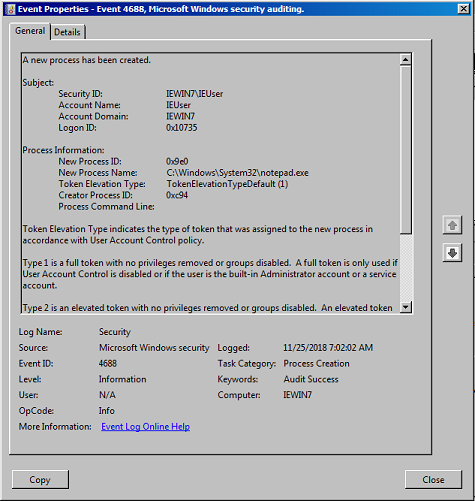
We can verify both logging options are working by opening any application and viewing the logs within Windows Event Viewer. In this example you can open notepad and should see event logs similar to below. First is the built in event id 4688 from "Windows Logs\Security"
Next is the Sysmon event from "Application and Service Logs\Microsoft\Windows\Sysmon" and as we can see the Sysmon log is far better and includes full command lines, process GUID's and even MD5 hashes of the process!

Planning a Simulation Using Mitre Att&ck and Atomic Red Team
We can't always perform a full red team to test every specific control, but it's important we can verify an attackers TTP using real data. So how do we do this?
Enter Atomic Red Team, a system for running small self contained "atomic tests" all based on the Mitre Att&ck framework.
Lets get it installed then take a closer look.
- Clone Atomic Red Team with "git clone https://github.com/redcanaryco/atomic-red-team"
- Install powershell-yaml dependencies from a PowerShell window with "Install-Module -Name powershell-yaml"
- Cd into the repo directory, in my case it's "cd C:\Coding\atomic-red-team"
- Load the powershell module "Import-Module .\execution-frameworks\Invoke-AtomicRedTeam\Invoke-AtomicRedTeam\Invoke-AtomicRedTeam.psm1"
- View the module options using "get-help Invoke-AtomicTest"
Atomic red team uses the Mitre Att&ck framework to categorise tests depending in the type of technique. If you haven't used Att&ck before then I thoroughly recommend spending some time reading it, because it's an invaluable resource describing attacker tools, techniques and procedures.
We're looking for information on MSBuild and searching the Att&ck matrix for "MSBuild" brings us to the page Trusted Developer Utilities, which is exactly what we want.
Take note of the ID highlighted in bold, this is what we need to run our test.
ID: T1127
Tactic: Defense Evasion, Execution
Platform: Windows
Permissions Required: User
Data Sources: Process monitoring
Supports Remote: No
Defense Bypassed: Application whitelisting
Contributors: Casey Smith, Matthew Demaske, Adaptforward
Version: 1.0
Now we have the Att&ck technique ID we can review the test within Atomic Red Team.
Navigate to "./atomics/T1127/T1127.yaml" and review the yaml file, this is how the tests are configured. There are 3 tests in this file but we're only interested in MSBuild in the snippet below. The important parts here are the msbuild.exe command and the filename containing the payload.
yamlattack_technique: T1127
display_name: Trusted Developer Utilities
atomic_tests:
- name: MSBuild Bypass Using Inline Tasks
	description: |
    	Executes the code in a project file using. C# Example
    supported_platforms:
        - windows
    input_arguments:
    	filename:
        description: Location of the project file
        type: Path
        default: T1127.csproj
    executor:
    	name: command_prompt
        command: |
        	C:\Windows\Microsoft.NET\Framework\v4.0.30319\msbuild.exe #{filename}
Lets check the payload by taking a closer look at the file in "./atomics/T1127/src/T1127.csproj".
As we can see in the snippets the payload executes two inline tasks to print a couple of simple hello world strings to the console. Harmless enough and will work perfectly for our purposes.
<Code Type="Fragment" Language="cs">
    <![CDATA[
		Console.WriteLine("Hello From a Code Fragment");
	]]>
</Code>

<Code Type="Class" Language="cs">
    <![CDATA[
		using System;
		using Microsoft.Build.Framework;
		using Microsoft.Build.Utilities;
		public class ClassExample :  Task, ITask
		{
			public override bool Execute()
			{
				Console.WriteLine("Hello From a Class.");
				return true;
			}
		}
	]]>
</Code>
Executing Atomic Test T1127 to Generate Event Log Data
And now we're ready to test! Using Invoke-AtomicTest we can execute the "Trusted Developer Utilities" set of tasks which includes the MSBuild test we've just reviewed.
Note 25/11/2018 - There appears to be a a bug or some missing features and running Invoke-AtomicTest as described in the documentation doesn't specify the correct path for the source file. We can do a quick hack to fix this in line 2 by configuring the path directly.
#Don't forget to import the module if you didn't do that above
Install-Module -Name powershell-yaml
#Load the T1127 Trusted Developer Utilties test
$T1127 = Get-AtomicTechnique -Path .\atomics\T1127\T1127.yaml
# Set the correct file including full path
$T1127.atomic_tests[0].input_arguments.filename.default = "C:\Coding\atomic-red-team\atomics\T1127\src\T1127.csproj"
# Run the testInvoke-AtomicTest
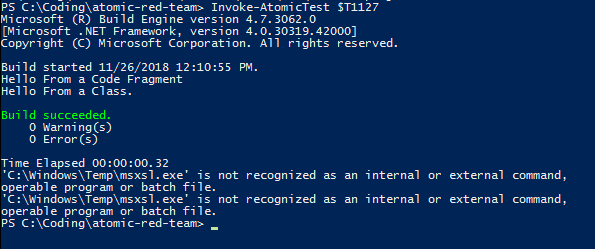
$T1127On successful execution of the test you should see something similar to below. Don't worry about the XML tests, they fail on my box but we're only interested in MSBuild for now.
Reviewing Windows Logs
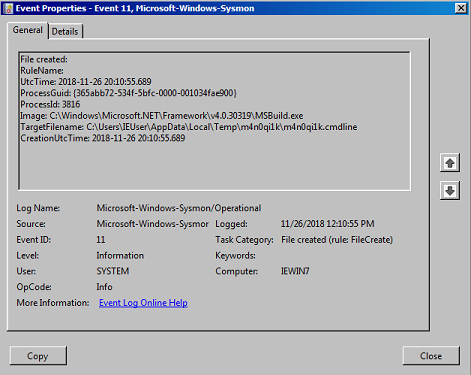
The MSBuild.exe test has completed successfully and we should have some results in both the Windows security log and Sysmon log. Let take a look!
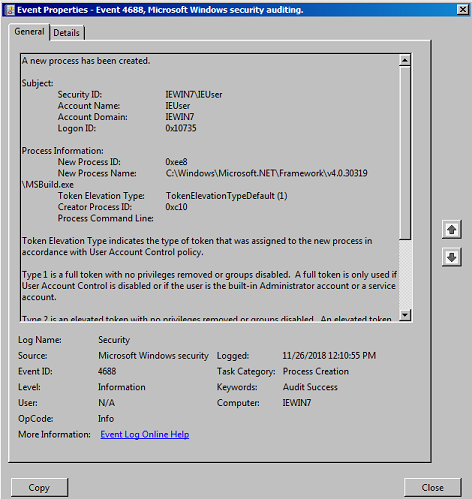
In the first image below we can see the plain event id 4688, it's captured the MSBuild.exe process start but not much else. We could create a very basic SIEM use case with this however you may find a large number of false positives. One issue with event id 4688 is that the "Creator Process ID" field is limited and it can be difficult to correlate events.
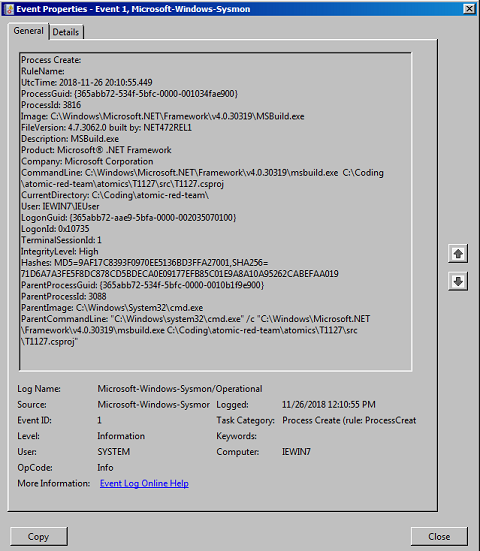
Sysmon provides a far more useful output. As we saw in the notepad.exe test we have the full command line, process hashes, parent process name and unique GUIDs for both processes. The Sysmon event gives us a lot of options to build a robust use case with granular whitelisting to filter out any legitimate processes.
We can also see any file creation events and in the second image an example of a temporary file generated by MSBuild.
Summary
We've now got some log data for this technique and also started building a robust, repeatable, enterprise ready framework for all our blue team detection use cases in future.
Using Att&ck and Atomic Red Team to Detect MSBuild Abuse (Part 2) will expand on this to create detection logic, draft our documentation and review common false positives.
